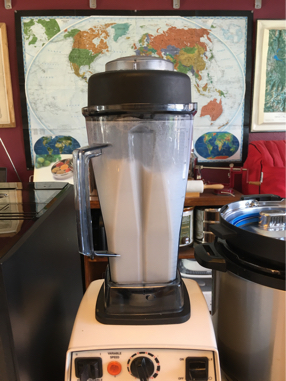
This recipe for homemade coconut milk uses only two ingredients, is super-easy to make, and delicious – plus it’s vegan AIP compliant, and very clean (some of us here at the Happy Gluten-Free Vegan are now following the vegan AIP diet)! Once you make this homemade coconut milk you will never want to buy store-bought coconut milk again. (Note: This recipe is or can be made vegan AIP friendly. Please note that not all recipes on this site are AIP compliant, although they are all vegan and gluten-free.)
🐶 HEY! WE GOT YOU 10% OFF ALL V-DOG VEGAN DOG FOOD AND TREATS!🐾
NO EMAIL ADDRESS NEEDED!
Just use our special coupon code HAPPYGFVEGAN at the V-Dog website!
It also requires an Instant Pot or other pressure cooker, and a Vitamix or other high-speed blender. If you don’t have an Instant Pot yet, this is a perfect excuse to get one. :~)
AIP stands for either auto-immune protocol, or anti-inflammatory protocol, depending on who you speak with and who is doing it.
The vegan AIP diet means, among other things, that you can’t have grains, nuts, seeds, nightshades, or legumes – all often staples of the vegetarian and vegan diet! This also means that your choice of non-dairy milk alternatives suddenly plummets, because you can’t have almond milk, soy milk, hemp milk, or even oat milk.
Thank you! ❤️
*Receipts will come from ISIPP.
Fortunately, there are lots of things that you can have, and that includes coconut, and coconut milk! However, most commercial coconut milk has other ingredients added to it. For example guar gum, which, if you are being strict about your vegan AIP diet, you shouldn’t have.
Plus, generally speaking, who wants or needs any additives in your coconut milk (or anything, really)? What you want is the cleanest, purest version of whatever it is you are eating. Well, this homemade coconut milk is it!
Now, other recipes for making homemade coconut milk call for shredded coconut, however we have tried both shredded and flaked coconut, and we vastly prefer using flaked coconut. For one thing, we think it makes a nicer, creamier coconut milk. For another thing, while you may still want to strain it, the stuff you strain out is a bit less gritty, and can be reserved to use in recipes (or even just eaten with a spoon :~) ). Of course you can do that with the strained stuff from shredded coconut too – we just prefer the outcome with flaked coconut. Sometimes we even just leave it all in the coconut milk, especially if we’re going to use the coconut milk in recipes and smoothies rather than drinking it straight. It’s up to you whether to strain or not.
So, here is our recipe for homemade coconut milk. Again, you need an Instant Pot or other pressure cooker, and a strong, high-speed blender like a Vitamix. This recipe makes 1 quart of homemade coconut milk.
Homemade Coconut Milk – Vegan AIP Friendly
1 heaping cup of unsweetened, raw (not toasted) coconut flakes* (we get a killer deal on 25 lbs of Let’s Do Organic coconut flakes on Amazon, at just .20 an ounce!)
4 cups water (we use filtered water)
*More or less, to taste. After you make this a few times, you will figure out just how coconutty you want it to taste.
Note that once you get the hang of it, you can use more or less coconut, to taste.
Ideally soak the coconut in the water overnight, or soak it in the morning and make it in the evening. You don’t have to soak it, but we think that it makes for an even creamier coconut milk. If you do soak it, soak it in the same 4 cups of water that you are going to use to complete the recipe.
Put the water and coconut in your Instant Pot, and set your Instant Pot to manual, high pressure, for 20 minutes.
When it is done, it is best to let it natural pressure release, but you can quick release it if you need to.
Once the pressure is down, open your Instant Pot, remove the inner pot, and set it somewhere to cool.
Right now it will still look like a bunch of coconut flakes floating in water. That’s fine! That’s how it’s supposed to look.
Once it has cooled sufficiently (lukewarm or cooler) transfer the coconut and water to your Vitamix or other high speed blender.
Put the blender lid on firmly and start blending it slowly, gradually increasing the speed until you are at full speed. Blend on full speed for 5 minutes.

Once your coconut milk is done blending, transfer to a container. If you are going to strain it first, we’ve found that straining it directly into the container, using a fine mesh strainer and a canning funnel, works really well.

Let your coconut milk cool (it will have gotten warm again in the blender),and then store it in the refrigerator.
Yummy Homemade Coconut Milk!


The Happy Gluten-Free Vegan is always free, always reader-supported. Your tips via CashApp, Venmo, or Paypal are appreciated. Receipts will come from ISIPP.


 Our recipe book contains 50 of our favorite recipes, all vegan, all gluten-free, instantly downloadable!
Hi – how do you cook this if you don’t have an instant pot or pressure cooker? I live in the tropics and don’t need to cook much. Thanks, Belinda
You can simmer it, although you will need to experiment with how long works best; the purpose of cooking it is just to soften it to make blending it easier and more productive.
This is the best, cleanest coconut milk ever! I had no idea it could be so easy!
I used shredded. I’ve not tried flaked – but will give it a go. Thanks for the info. I’ll post back after I’ve done the comparison.
We honestly don’t know, as we’ve never done it without cooking it first. 🙂 It only made sense to us that it would soften it and make more of it available in the blender. Are you using shredded or flaked coconut?
I have been making mine directly in the vitamix without soaking or cooking …what is the difference when you take these steps ? I’ll give it a go – but just curious to know how big of a difference it makes. Thanks